
Lesson 10: Basic Tools in Adobe Photoshop
Lesson Overview:
In this lesson, students will learn about the basic tools in Adobe Photoshop that are essential for photo editing and graphic design. Understanding how to use these tools is the first step toward creating professional designs, retouching photos, and manipulating images. Students will explore the most commonly used tools, their functions, and how they apply to real-world design projects.
Students must ensure that they have Adobe Photoshop software installed on their computer. if you don’t have Click Here

Lesson Content:
1. The Move Tool (Shortcut: V)
- Explanation:
The Move Tool is used to move images, layers, or selections within a Photoshop project. It’s essential for positioning elements like text or images where you want them on the canvas.

- Real-World Example:
If you are designing a flyer and want to move the logo from the top to the bottom of the page, you would use the Move Tool to drag it into the desired position.
2. The Marquee Tool (Shortcut: M)
- Explanation:
The Marquee Tool is used to make rectangular or elliptical selections. This tool allows you to select a specific area of an image or layer for editing. - Real-World Example:
If you need to crop a specific section of a picture or apply a filter only to a part of an image, you would first select that area using the Marquee Tool. - Types of Marquee Tools:
- Rectangular Marquee Tool
- Elliptical Marquee Tool
3. The Lasso Tool (Shortcut: L)
- Explanation:
The Lasso Tool allows you to create free-form selections by drawing around the area you want to select. It’s great for selecting irregular shapes in an image.
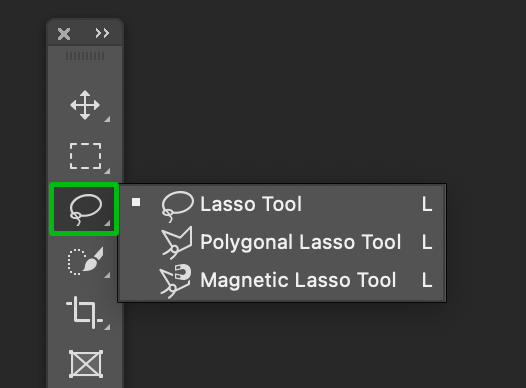
- Real-World Example:
When editing a family photo, if you want to remove the background around a person’s hair, you can use the Lasso Tool to carefully trace the outline of the person, separating them from the background.
4. The Brush Tool (Shortcut: B)
- Explanation:
The Brush Tool is used for painting on an image or layer. You can adjust the size, hardness, and opacity of the brush to achieve different effects. This tool is essential for digital painting, touch-ups, and adding artistic elements.
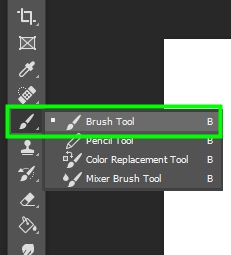
- Real-World Example:
Graphic designers often use the Brush Tool to add shading or highlights to a product design, making it look more realistic. For instance, an illustrator might use the Brush Tool to add texture to a digital painting of a landscape.
5. The Eraser Tool (Shortcut: E)
- Explanation:
The Eraser Tool removes parts of an image or layer. You can erase mistakes, clear sections, or create transparency in areas of the image.
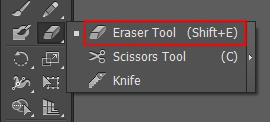
- Real-World Example:
If you’re designing a logo and want to erase part of a background to make it transparent, you would use the Eraser Tool to clear that area.
6. The Crop Tool (Shortcut: C)
- Explanation:
The Crop Tool is used to trim an image, removing unwanted outer areas and resizing the canvas to focus on a particular subject.

- Real-World Example:
When editing a photo for social media, you might use the Crop Tool to remove the outer edges and center the subject, ensuring it fits within specific dimensions (e.g., a square format for Instagram).
7. The Gradient Tool (Shortcut: G)
- Explanation:
The Gradient Tool creates a gradual blend between multiple colors. It’s useful for creating backgrounds, shadows, or effects that transition smoothly between colors.
- Real-World Example:
Web designers often use the Gradient Tool to create smooth, colorful backgrounds for websites, such as blending blue to white to simulate a sky-like effect.
8. The Text Tool (Shortcut: T)
- Explanation:
The Text Tool allows you to add text to your images or designs. You can choose different fonts, sizes, and colors to customize the text.
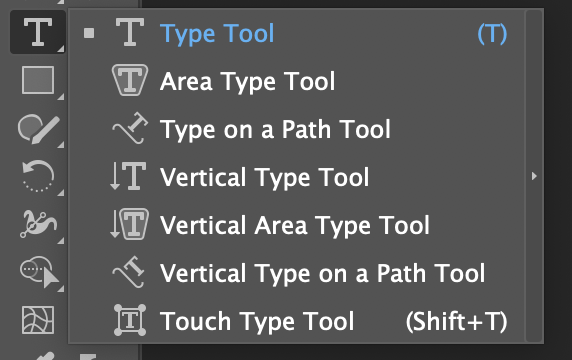
- Real-World Example:
If you’re designing a poster for a school event, you’ll use the Text Tool to add titles, dates, and other important information to the design.
9. The Magic Wand Tool (Shortcut: W)
- Explanation:
The Magic Wand Tool selects pixels of similar color with one click. It’s great for selecting large, solid-colored areas quickly.
- Real-World Example:
When working on a product photo that has a white background, you can use the Magic Wand Tool to select the entire white background with one click and then remove or replace it.
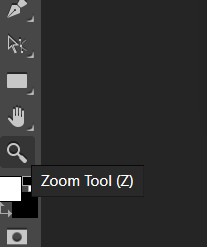
10. The Zoom Tool (Shortcut: Z)
- Explanation:
The Zoom Tool allows you to zoom in or out on an image to see details more clearly or get a broader view of your project.
- Real-World Example:
When editing a high-resolution photo, designers use the Zoom Tool to get closer to small details like hair strands or the edges of a product to ensure precise editing.
Conclusion:
Understanding the basic tools in Adobe Photoshop is essential for anyone interested in graphic design or photo editing. These tools are the building blocks for creating professional designs, whether you’re working on a school project, a business flyer, or enhancing personal photos.